2025电赛视觉——K230自训练模型串口发送问题解决(Base亚博智能)
2025电赛视觉——K230自训练模型串口发送问题解决(Base亚博智能)
K230自训练模型串口发送问题解决(Base亚博智能)
基础问题的解决
之前本来想直接基于亚博智能的yolov8目标检测魔改,后来技术客服说不能直接魔改还是得基于佳楠科技的去使用……因此搞了整整一下午,最后还是在ai的帮助下完成了相关内容的调试。
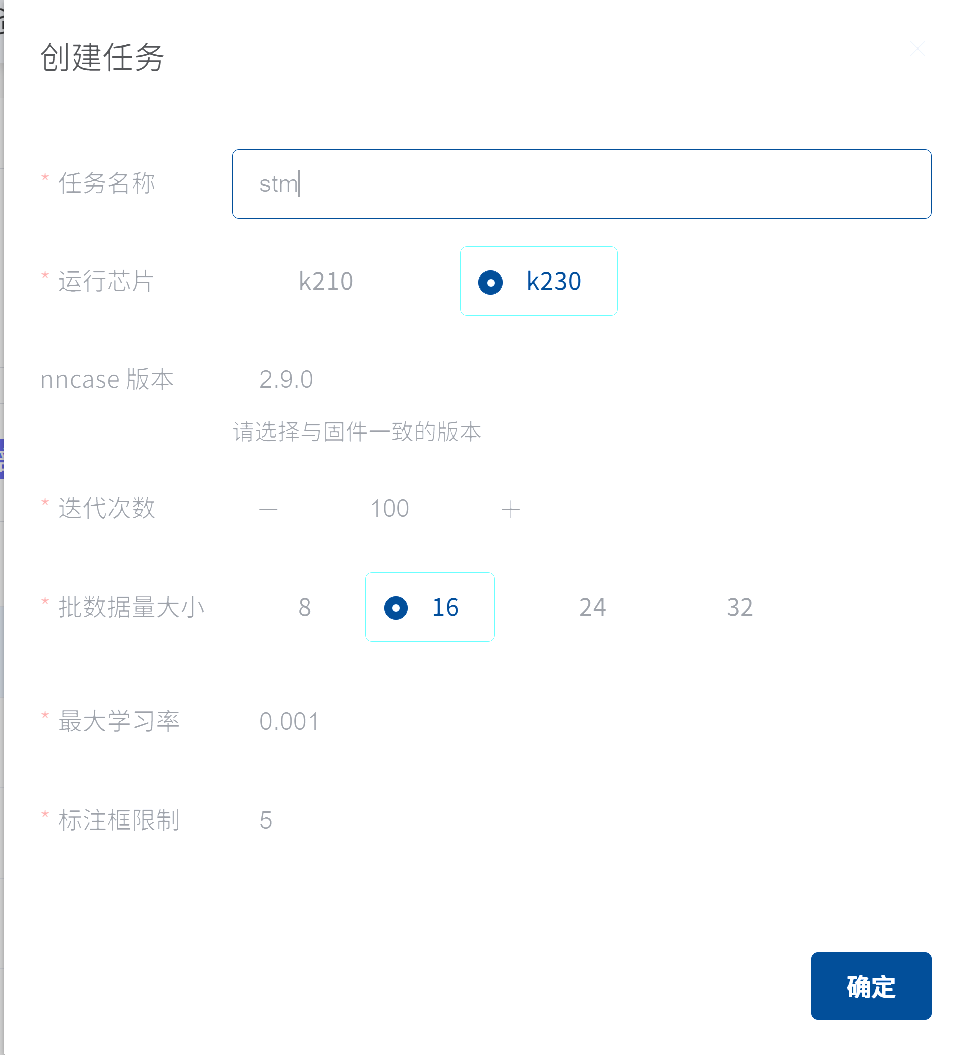
作者自己想自己训练一个识别stm32单片机的yolo目标检测算法,一开始基于佳楠科技在线训练后可以得到一个压缩包,nncase版本的多少就看固件烧的是哪一个,名字里就能够看出来;此外,为保证识别精度,建议一个目标能采样100张以上。
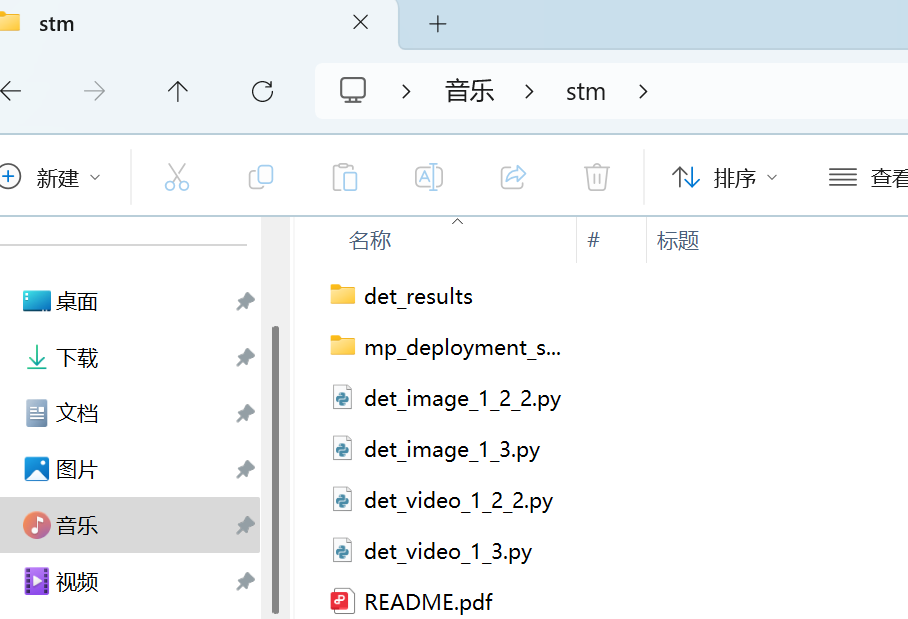
得到的压缩包如下,就把mp_deployment_source文件夹放到sdcard目录里面就行,随后打开det_vedio_1_3.py,直接运行就会发现已经能正确识别单片机了,但是却不能像官方例程用yolov8一样在终端输出对应信息并通过串口发送,根本问题就在于没有打开串口及时反馈相应信息,因此需要魔改。
观察官方例程(部分可以发现)完成串口发送代码主要是自定义函数draw_results
def draw_result(self,pl,dets):
    """
    绘制检测结果 Draw detection results
    pl: PipeLine实例 PipeLine instance
    dets: 检测结果 Detection results
    """
    with ScopedTiming("display_draw",self.debug_mode >0):
        if dets:
            pl.osd_img.clear()
            for i in range(len(dets[0])):
                x, y, w, h = map(lambda x: int(round(x, 0)), dets[0][i])
                # 绘制矩形框和标签 Draw rectangle box and label
                pl.osd_img.draw_rectangle(x,y, w, h, color=self.color_four[dets[1][i]],thickness=4)
                pl.osd_img.draw_string_advanced( x , y-50,32,
                    " " + self.labels[dets[1][i]] + " " + str(round(dets[2][i],2)) ,
                    color=self.color_four[dets[1][i]])

                pto_data = pto.get_object_detect_data(x, y, w, h, self.labels[dets[1][i]])
                uart.send(pto_data)
                print(pto_data)
        else:
pl.osd_img.clear()在主函数里可以发现传入的就是res
# 推理当前帧 Inference current frame
res = ob_det.run(img)
# 绘制结果 Draw results
ob_det.draw_result(pl,res)因此要想实现diy串口接发就得搞清楚res是啥
这时候可以进入libs文件夹逐个查阅引用的文件并用Ctrl+F查找res,就在PlatTasks.py里看到了关于res的定义
class DetectionApp(AIBase):(注意是Detection这个类因为是目标检测)
......
    # 将结果绘制到屏幕上
    def draw_result(self,draw_img,res):
        with ScopedTiming("draw osd",self.debug_mode > 0):
            if self.mode=="video":
                draw_img.clear()
            if res["boxes"]:
                for i in range(len(res["boxes"])):
                    x=int(res["boxes"][i][0] * self.display_size[0] // self.rgb888p_size[0])
                    y=int(res["boxes"][i][1] * self.display_size[1] // self.rgb888p_size[1])
                    w = int(float(res["boxes"][i][2] - res["boxes"][i][0]) * self.display_size[0] // self.rgb888p_size[0])
                    h = int(float(res["boxes"][i][3] - res["boxes"][i][1]) * self.display_size[1] // self.rgb888p_size[1])
                    draw_img.draw_rectangle(x , y , w , h , color=self.color_four[res["idx"][i]])
                    draw_img.draw_string_advanced(x, y-50,24, self.labels[res["idx"][i]] + " " + str(round(res["scores"][i],2)) , color=self.color_four[res["idx"][i]])
由此可以得知
res["boxes"]: 是一个列表,其中每个元素 res["boxes"][i] 是一个包含4个整数的数组,格式为 [x_min, y_min, x_max, y_max]。
res["idx"]: 是一个列表,其中每个元素 res["idx"][i] 是一个整数,代表类别索引。
res["scores"]: 是一个列表,其中每个元素 res["scores"][i] 是一个浮点数,代表置信度。
也就是说
dets[0]: 包含所有最终边界框的列表,每个边界框是 [x, y, w, h]。
dets[1]: 包含每个边界框对应类别索引的列表。
dets[2]: 包含每个边界框对应置信度分数的列表。
因此,关键在于:基于``res["boxes"][i]中计算出x, y, w, h`
就可以得到下面的代码用于替换while
while True:
    with ScopedTiming("total", 1):
        # 1. 获取摄像头图像
        img = pl.get_frame()

        # 2. 运行目标检测模型,获取结果
        res = det_app.run(img)

        # 3. 检查是否有检测结果,并遍历每一个结果
        if res and res["boxes"]:
            for i in range(len(res["boxes"])):
                # 从 res["boxes"] 中获取原始坐标 [x_min, y_min, x_max, y_max]
                box = res["boxes"][i]
                x_min, y_min, x_max, y_max = box[0], box[1], box[2], box[3]

                # 计算物体的 x, y, 宽度, 高度
                x = x_min
                y = y_min
                w = x_max - x_min
                h = y_max - y_min

                # 从 res["idx"] 中获取类别索引,并找到对应的标签名称
                class_index = res["idx"][i]
                label_name = labels[class_index]

                # 准备并通过串口发送数据
                pto_data = pto.get_object_detect_data(x, y, w, h, label_name)
                uart.send(pto_data)
                print("发送串口数据:", pto_data) # 打印调试信息

        # 4. 在屏幕上绘制检测结果(这一步不受影响)
        det_app.draw_result(pl.osd_img, res)

        # 5. 显示画面
        pl.show_image()

        # 6. 垃圾回收
        gc.collect()
就可以得到和官方例程一样的输出:
total took 35.36 ms
发送串口数据: $27,14,090,051,052,032,stm#

total took 35.34 ms
发送串口数据: $27,14,092,048,051,037,stm#

total took 35.63 ms
发送串口数据: $27,14,090,048,052,037,stm#

total took 33.39 ms
发送串口数据: $27,14,090,048,052,037,stm#

total took 35.47 ms
发送串口数据: $27,14,090,046,052,041,stm#

total took 37.54 ms
发送串口数据: $27,14,090,048,052,037,stm#

total took 34.81 ms
发送串口数据: $27,14,090,048,052,037,stm#

total took 34.00 ms
发送串口数据: $27,14,090,048,052,037,stm#

total took 35.18 ms
发送串口数据: $27,14,090,048,052,037,stm#

total took 34.84 ms
发送串口数据: $27,14,090,051,052,033,stm#

total took 36.54 ms
发送串口数据: $27,14,090,048,052,037,stm#

total took 34.52 ms
发送串口数据: $27,14,090,047,052,037,stm#
更进一步地,也可以尝试直接封装函数(不过受权限控制好像改不了)
在 DetectionApp 类中添加 send_serial_data 方法:
class DetectionApp(AIBase):
    # ... __init__, config_preprocess, postprocess 等方法保持不变 ...

    # 绘制结果函数
    def draw_result(self,draw_img,res):
        # ... (此函数保持不变)

    # 新增:发送串口数据的函数
    def send_serial_data(self, res, pto_instance, uart_instance, labels_list):
        if res and res["boxes"]:
            for i in range(len(res["boxes"])):
                box = res["boxes"][i]
                x_min, y_min, x_max, y_max = box[0], box[1], box[2], box[3]
                w = x_max - x_min
                h = y_max - y_min

                class_index = res["idx"][i]
                label_name = labels_list[class_index]

                pto_data = pto_instance.get_object_detect_data(x_min, y_min, w, h, label_name)
                uart_instance.send(pto_data)
                print("发送串口数据:", pto_data)

    def get_cur_result(self):
return self.cur_result随后while就可以用更简洁的形式编写:
while True:
    with ScopedTiming("total", 1):
        img = pl.get_frame()                  # 获取图像
        res = det_app.run(img)                # 运行推理

        # 调用专门的函数来处理串口发送
        det_app.send_serial_data(res, pto, uart, labels)

        det_app.draw_result(pl.osd_img, res)  # 绘制结果
        pl.show_image()                       # 显示画面
        gc.collect()                          # 垃圾回收
DIY一个串口输出函数
亚博官方的串口发送函数会把例程对应序号和长度也输出出去,个人感觉没啥必要因此就想diy一个。
只需要用fstring替换原来的代码即可:
pto_data = pto_instance.get_object_detect_data(x_min, y_min, w, h, label_name) -> pto_data = f"${x_min}, {y_min}, {w}, {h}, {label_name}#"更进一步地,要是想实现只输出识别物体的中心点等其他需求,可以这样操作
首先需要在获取到物体的 x, y, w, h 后,计算出它的中心点坐标:
x,y是左上角的坐标w,h是物体的宽度和高度
中心点坐标的计算公式是:
center_x = x + w / 2center_y = y + h / 2
在发送数据前,最好先定义一个简单的格式,这样接收方(比如STM32、Arduino)才能准确地解析数据。一个好的协议通常包含:
- 起始符:告诉接收方一条新数据的开始,比如
$或*。 - 数据体:想发送的实际内容,数据之间用分隔符(如逗号
,)隔开。 - 结束符:告诉接收方这条数据已经结束,比如
#或换行符\n。
根据发送中心点坐标的需求可以定义这样一个格式:$center_x,center_y#。 例如,如果中心点是 (120, 240),那么发送的字符串就是 $120,240#。
while True:
    with ScopedTiming("total", 1):
        img = pl.get_frame()
        res = det_app.run(img)

        if res and res["boxes"]:
            for i in range(len(res["boxes"])):
                # --- 从这里开始修改 ---

                # 1. 获取原始坐标和宽高
                box = res["boxes"][i]
                x_min, y_min, x_max, y_max = box[0], box[1], box[2], box[3]
                w = x_max - x_min
                h = y_max - y_min

                # 2. 计算中心点坐标
                center_x = x_min + w // 2
                center_y = y_min + h // 2

                # 3. 按照自定义的协议,手动创建字符串
                #    我们使用 f-string 功能,非常方便
                custom_pto_data = f"${center_x},{center_y}#" #或者f"${center_x},{center_y},{label_name}#"

                # 4. 发送自定义的字符串
                uart.send(custom_pto_data)
                print("发送自定义串口数据:", custom_pto_data)

        # 屏幕绘制部分不受影响
        det_app.draw_result(pl.osd_img, res)
        pl.show_image()
        gc.collect()
最后,给出我的完整代码
# -*- coding: utf-8 -*-
'''
Script: deploy_det_video.py
脚本名称:deploy_det_video.py

Description:
    This script runs a real-time object detection application on an embedded device.
    It uses a pipeline to capture video frames, performs inference using a pre-trained Kmodel,
    and displays the detection results (bounding boxes, class labels) on screen.

    The model configuration is loaded from the Canaan online training platform via a JSON config file.

脚本说明:
    本脚本在嵌入式设备上运行实时目标检测应用。它通过捕获视频帧,使用预训练的 Kmodel 进行推理,并在屏幕上显示检测结果(边界框、类别标签)。

    模型配置文件通过 Canaan 在线训练平台从 JSON 文件加载。

Author: Canaan Developer
作者:Canaan 开发者
'''


import os, gc
from libs.PlatTasks import DetectionApp
from libs.PipeLine import PipeLine
from libs.Utils import *
from libs.YbProtocol import YbProtocol
from ybUtils.YbUart import YbUart
# uart = None
uart = YbUart(baudrate=115200)
pto = YbProtocol()
# Set display mode: options are 'hdmi', 'lcd', 'lt9611', 'st7701', 'hx8399'
# 'hdmi' defaults to 'lt9611' (1920x1080); 'lcd' defaults to 'st7701' (800x480)
display_mode="lcd"
rgb888p_size=[224,224]

# 根据显示模式设置分辨率 Set resolution based on display mode
if display_mode=="hdmi":
    display_size=[1920,1080]
else:
    display_size=[640,480]

# Set root directory path for model and config
root_path = "/sdcard/mp_deployment_source/"

# Load deployment configuration
deploy_conf = read_json(root_path + "/deploy_config.json")
kmodel_path = root_path + deploy_conf["kmodel_path"]              # KModel path
labels = deploy_conf["categories"]                                # Label list
confidence_threshold = deploy_conf["confidence_threshold"]        # Confidence threshold
nms_threshold = deploy_conf["nms_threshold"]                      # NMS threshold
model_input_size = deploy_conf["img_size"]                        # Model input size
nms_option = deploy_conf["nms_option"]                            # NMS strategy
model_type = deploy_conf["model_type"]                            # Detection model type
anchors = []
if model_type == "AnchorBaseDet":
    anchors = deploy_conf["anchors"][0] + deploy_conf["anchors"][1] + deploy_conf["anchors"][2]

# Inference configuration
inference_mode = "video"                                          # Inference mode: 'video'
debug_mode = 0                                                    # Debug mode flag

# Create and initialize the video/display pipeline
pl = PipeLine(rgb888p_size=rgb888p_size, display_mode=display_mode)
pl.create()
display_size = pl.get_display_size()

# Initialize object detection application
det_app = DetectionApp(inference_mode,kmodel_path,labels,model_input_size,anchors,model_type,confidence_threshold,nms_threshold,rgb888p_size,display_size,debug_mode=debug_mode)

# Configure preprocessing for the model
det_app.config_preprocess()

# Main loop: capture, run inference, display results
while True:
    with ScopedTiming("total", 1):
        # 1. 获取摄像头图像
        img = pl.get_frame()

        # 2. 运行目标检测模型,获取结果
        res = det_app.run(img)

        # 3. 检查是否有检测结果,并遍历每一个结果
        if res and res["boxes"]:
            for i in range(len(res["boxes"])):
                # 从 res["boxes"] 中获取原始坐标 [x_min, y_min, x_max, y_max]
                box = res["boxes"][i]
                x_min, y_min, x_max, y_max = box[0], box[1], box[2], box[3]

                # 计算物体的 x, y, 宽度, 高度
                x = x_min
                y = y_min
                w = x_max - x_min
                h = y_max - y_min
                center_x = x_min + w // 2
                center_y = y_min + h // 2
                # 从 res["idx"] 中获取类别索引,并找到对应的标签名称
                class_index = res["idx"][i]
                label_name = labels[class_index]

                # 准备并通过串口发送数据
                pto_data = f"${center_x},{center_y},{label_name}#"
                uart.send(pto_data)
                print("发送串口数据:", pto_data) # 打印调试信息

        # 4. 在屏幕上绘制检测结果(这一步不受影响)
        det_app.draw_result(pl.osd_img, res)

        # 5. 显示画面
        pl.show_image()

        # 6. 垃圾回收
        gc.collect()
# Cleanup: These lines will only run if the loop is interrupted (e.g., by an IDE break or external interruption)
det_app.deinit()                                          # De-initialize detection app
pl.destroy()                                              # Destroy pipeline instance
基于本地训练的模型部署及串口通信
在此之前还是先把本人可行的训练流程贴一下(主要基于yolo大作战):
博主手边就有一个说stm32的F103C8T6,因此就想把stm32识别出来。
- ①克隆
yolov5
git clone https://github.com/ultralytics/yolov5.git- ②先安装
torch和cuda
参考的是国内源安装torch2.1.2+cu121、torch2.3.1+cu121_torch==2.1.2-CSDN博客,也就是阿里云源提供了镜像,清华源好像是没有提供
pip install torch==2.3.1+cu121 torchvision torchaudio -f https://mirrors.aliyun.com/pytorch-wheels/cu121/
- ③然后安装
requirements.txt
cd yolov5
pip install -r requirements.txt- ④训练
python train.py --weight yolov5n.pt --cfg models/yolov5n.yaml --data datasets/try.yaml --epochs 100 --batch-size 16 --imgsz 320 --device '0'- ⑤训练前准备:
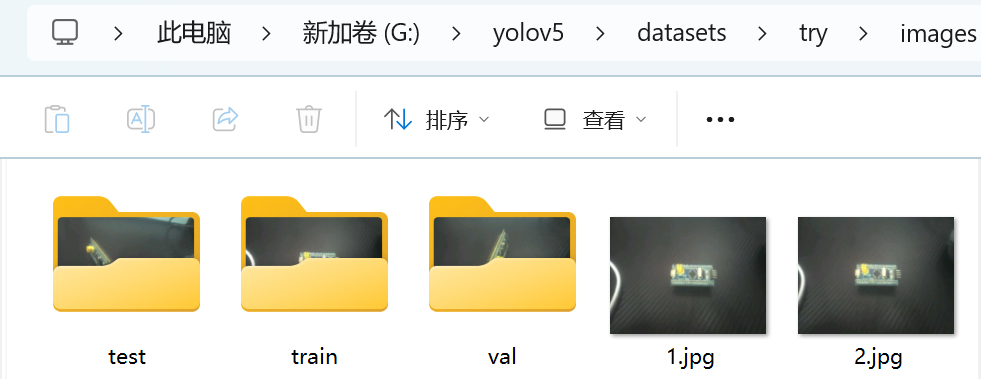
代码需要yaml提供参考,告诉代码文件夹路径和类别名称,因此需要提前准备好相关内容。具体流程就是按照合理比例划分images和labels的train、test、val文件夹,然后借助在线打标工具makesense.ai打就行,这个软件比较简单不懂的话可以查看其他帖子。然后选择Action的Export进行导出,如果是用佳楠训练就导出xml,本地训练就导出txt,然后也将其放到labels里的train、test、val文件夹(注意要和images名字、内容都要对的上)。
try.yaml就是直接模仿的水果数据集的yaml。
fruits_yolo.yaml
# Train/val/test sets as 1) dir: path/to/imgs, 2) file: path/to/imgs.txt, or 3) list: [path/to/imgs1, path/to/imgs2, ..]
path: datasets/fruits_yolo # dataset root dir
train: images/train # train images (relative to 'path')
val: images/val # val images (relative to 'path')
test: images/test # test images (optional)

# Classes (3 classes)
names:
    0: apple
    1: banana
    2: orange
try.yaml
# Train/val/test sets as 1) dir: path/to/imgs, 2) file: path/to/imgs.txt, or 3) list: [path/to/imgs1, path/to/imgs2, ..]
path: datasets/try # dataset root dir
train: images/train # train images (relative to 'path')
val: images/val # val images (relative to 'path')
test: images/test # test images (optional)

# Classes (3 classes)
names:
0: stm- ⑥转换为
onno文件(博主这里已经训练过五次因此是exp5,要根据实际情况调整内容)
首先要先配置环境,建议使用wsl Ubuntu 22.04或者配个虚拟机VMware,博主嫌麻烦就用了wsl
# linux平台:nncase和nncase-kpu可以在线安装,nncase-2.x 需要安装 dotnet-7
sudo apt-get install -y dotnet-sdk-7.0
pip install --upgrade pip
pip install nncase==2.9.0
pip install nncase-kpu==2.9.0其中这个==nncase版本和上文一样要根据软件版本号确定==
# 除nncase和nncase-kpu外,脚本还用到的其他库包括:
pip install onnx
pip install onnxruntime
pip install onnxsim随后可以转换为onnx格式了
# 导出onnx,pt模型路径请自行选择
python export.py --weight runs/train/exp5/weights/best.pt --imgsz 320 --batch 1 --include onnx- ⑦转换为
kmodel文件
还是先配置环境,下佳楠提供的脚本工具,将模型转换脚本工具 test_yolov5.zip 解压到 yolov5 目录下;(注意此时路径在yolov5下)
wget https://kendryte-download.canaan-creative.com/developer/k230/yolo_files/test_yolov5.zip
unzip test_yolov5.zip然后就可以转换kmodel
cd test_yolov5/detect
# 转换kmodel,onnx模型路径请自定义,生成的kmodel在onnx模型同级目录下
python to_kmodel.py --target k230 --model ../../runs/train/exp5/weights/best.onnx --dataset ../test --input_width 320 --input_height 320 --ptq_option 0
# 要是想回到yolov5文件夹目录下把下面的命令行也运行了
cd ../../
环境及相关权重转换好就可以改写代码了。
本地训练的源代码是基于佳楠科技的yolo大作战改写而成。本地部署和佳楠部署的最大区别就是没有json文件和用的类不一样,本地部署是直接基于yolo.py来创建,因此会导致res的结果也不一样。首先可以print(res)看看res的内容:示例为array([[74.0, 105.0, 151.0, 143.0, 0.5786896, 0.0]]因此这与佳楠的res是不一致的{'boxes': [[...], [...]], 'scores': [...], 'idx': [...]}就需要改动才可以使用。主要差别就在于获取坐标的过程,其他部分的参数可以直接抄佳楠的json文件。
具体代码如下:
from libs.PipeLine import PipeLine, ScopedTiming
from libs.YOLO import YOLOv5
import os,sys,gc
import ulab.numpy as np
import image
from libs.YbProtocol import YbProtocol
from ybUtils.YbUart import YbUart


uart = YbUart(baudrate=115200)
display_mode="lcd"
rgb888p_size=[224,224]
display_size=[640,480]
kmodel_path="/data/best.kmodel"
labels = ["stm"]
confidence_threshold = 0.3
nms_threshold=0.5
model_input_size=[320,320]
# 初始化PipeLine
pl=PipeLine(rgb888p_size=rgb888p_size,display_size=display_size,display_mode=display_mode)
pl.create()
# 初始化YOLOv5实例
yolo=YOLOv5(task_type="detect",mode="video",kmodel_path=kmodel_path,labels=labels,rgb888p_size=rgb888p_size,model_input_size=model_input_size,display_size=display_size,conf_thresh=confidence_threshold,nms_thresh=nms_threshold,max_boxes_num=50,debug_mode=0)
yolo.config_preprocess()

while True:
    with ScopedTiming("total",1):
        img=pl.get_frame()
        res=yolo.run(img)
        #print(res)
        if res is not None and len(res) > 0:
            for box_data in res:
                # box_data 长这样: [x_min, y_min, x_max, y_max, confidence, class_index]
                x_min = int(box_data[0])
                y_min = int(box_data[1])
                x_max = int(box_data[2])
                y_max = int(box_data[3])
                confidence = box_data[4]
                class_index = int(box_data[5])
                # print(f"Box: [{x_min},{y_min},{x_max},{y_max}], Conf: {confidence:.2f}, Class: {class_index}")

                # 计算物体的 x, y, 宽度, 高度
                x = x_min
                y = y_min
                w = x_max - x_min
                h = y_max - y_min
                center_x = x_min + w // 2
                center_y = y_min + h // 2

                # 从 labels 列表中获取类别名称
                # 确保 class_index 没有越界
                if class_index < len(labels):
                    label_name = labels[class_index]
                else:
                    label_name = "unknown" # 添加一个保护,防止索引错误

                # 准备并通过串口发送数据
                pto_data = f"${x_min},{y_min},{x_max},{y_max},{center_x},{center_y},{label_name}#"

                print("发送串口数据:", pto_data) # 打印调试信息
                uart.send(pto_data)


        yolo.draw_result(res,pl.osd_img)
        pl.show_image()
        gc.collect()
#    except Exception as e:
#        sys.print_exception(e)
#    finally:
yolo.deinit()
pl.destroy()